You are using an out of date browser. It may not display this or other websites correctly.
You should upgrade or use an alternative browser.
You should upgrade or use an alternative browser.
Patlabor Maintenance Facility
- Thread starter Papermodder
- Start date
Papermodder
Modeller in both Plastic and Paper Card
- Joined
- Jan 2, 2013
- Messages
- 1,224
Thank you Sunsanvil.
Jim
Jim
Papermodder
Modeller in both Plastic and Paper Card
- Joined
- Jan 2, 2013
- Messages
- 1,224
Thank you Grendels.
Had a slight problem to fix this morning.
If you look at the top 2 pieces of the left wall in the last two images of my last post, you will notice that the top section has a 2 mm overhang. this is no good as the next piece has to mount flush over these two spots.
What I did was print a copy of the end of the lower piece and laminate to 4 more pieces of card. Cut this out and attach to the end to space it out flush.
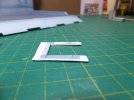
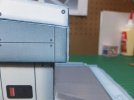
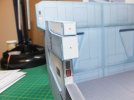
This was the easiest solution.
Thanks for viewing.
Jim
Had a slight problem to fix this morning.
If you look at the top 2 pieces of the left wall in the last two images of my last post, you will notice that the top section has a 2 mm overhang. this is no good as the next piece has to mount flush over these two spots.
What I did was print a copy of the end of the lower piece and laminate to 4 more pieces of card. Cut this out and attach to the end to space it out flush.


This was the easiest solution.
Thanks for viewing.
Jim
Papermodder
Modeller in both Plastic and Paper Card
- Joined
- Jan 2, 2013
- Messages
- 1,224
Hello.
Not a lot done today.
The end module with what would be a flashing light was assembled and installed to the left wall.
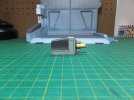
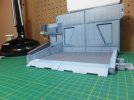
With what I see now with this maintenance station, there is a lot of opportunity to do lighting effects if you so wanted. Lots of room to run wiring and LEDs. Maybe in the future, if I want to do another build.
I have an idea in the back of my head to someday do a full dio with all 3 labors and personnel. We'll see.
Next is to start the second level of this station. It is slowly starting to look like something now.
Jim
Not a lot done today.
The end module with what would be a flashing light was assembled and installed to the left wall.


With what I see now with this maintenance station, there is a lot of opportunity to do lighting effects if you so wanted. Lots of room to run wiring and LEDs. Maybe in the future, if I want to do another build.
I have an idea in the back of my head to someday do a full dio with all 3 labors and personnel. We'll see.
Next is to start the second level of this station. It is slowly starting to look like something now.
Jim
CTspeedshop
I picked the wrong week to stop sniffing glue. : )
- Joined
- Apr 17, 2011
- Messages
- 1,388
Very nice!
Papermodder
Modeller in both Plastic and Paper Card
- Joined
- Jan 2, 2013
- Messages
- 1,224
Thank you CTspeedshop.
Jim
Jim
ModelMakerMike
"It's Slobberin' time""
- Joined
- May 28, 2011
- Messages
- 1,838
Looking good!
Papermodder
Modeller in both Plastic and Paper Card
- Joined
- Jan 2, 2013
- Messages
- 1,224
Thank you Mike.
Jim
Jim
ModelMakerMike
"It's Slobberin' time""
- Joined
- May 28, 2011
- Messages
- 1,838
WOW, it's all out of paper too!
Papermodder
Modeller in both Plastic and Paper Card
- Joined
- Jan 2, 2013
- Messages
- 1,224
Hi Mike, yes it is.
Jim
Jim
Papermodder
Modeller in both Plastic and Paper Card
- Joined
- Jan 2, 2013
- Messages
- 1,224
Thank you Java.
It will not be too long now.
Jim
It will not be too long now.
Jim
ModelMakerMike
"It's Slobberin' time""
- Joined
- May 28, 2011
- Messages
- 1,838
Is the Ingram made of paper too?
Papermodder
Modeller in both Plastic and Paper Card
- Joined
- Jan 2, 2013
- Messages
- 1,224
Yes it will.
Jim
Jim
Papermodder
Modeller in both Plastic and Paper Card
- Joined
- Jan 2, 2013
- Messages
- 1,224
Time for an update.
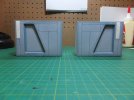
Started working on the second level of the back wall. These are again mostly box structures, so are not difficult to assemble. Though the fist section does have inserts that have to be assembled and installed.
The next section is more straight forward.
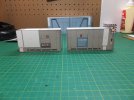
These were glued together then attached to the existing back wall.
One thing I found was that underneath the overhang piece did not have colouring. So printed off another copy of that section and cut out a filler piece to install there.
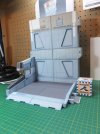
Detail parts were assembled for the top of this wall.
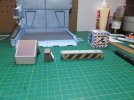
This is where the maintenance station sits at this moment.
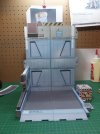
It is getting tall. 8)
Next we will start on the booms.
Thank you for watching.
Jim
Started working on the second level of the back wall. These are again mostly box structures, so are not difficult to assemble. Though the fist section does have inserts that have to be assembled and installed.

The next section is more straight forward.

These were glued together then attached to the existing back wall.
One thing I found was that underneath the overhang piece did not have colouring. So printed off another copy of that section and cut out a filler piece to install there.

Detail parts were assembled for the top of this wall.

This is where the maintenance station sits at this moment.

It is getting tall. 8)
Next we will start on the booms.
Thank you for watching.
Jim
Papermodder
Modeller in both Plastic and Paper Card
- Joined
- Jan 2, 2013
- Messages
- 1,224
You are welcome Jeff.
Jim
Jim
ModelMakerMike
"It's Slobberin' time""
- Joined
- May 28, 2011
- Messages
- 1,838
Coolio!
Papermodder
Modeller in both Plastic and Paper Card
- Joined
- Jan 2, 2013
- Messages
- 1,224
Thank you Mike.
Jim
Jim
Similar threads
- Replies
- 3
- Views
- 2K
Latest posts
-
-
-
thinning tamiya bottle paints for airbrushing
- Latest: KingCreole58
-
-
-
-
-
