AKRoast

New Member
Joined
Oct 14, 2024
Messages
11
I would like to ask if most of you are fine with PE parts? I feel like in the few armor and aircraft sets I have done, they were not really needed. They could be close enough with plastic, and the fact that they require CA glue means the chance of messing up is so much greater. I wish kits would always have two methods for the areas they think need PE parts, one using it and one not.

If the PE parts are combined with thin, weak plastic parts that must carry them, then it seems virtually impossible to do neatly.

I am working on a Leopard 2 kit from Tamiya, and it has 2 air filter baskets that hang off the turrent sides. The kit does have good built-in ways to bend the PE pieces, which is better then some kits I have done, but trying to superglue the metal to the thin plastic basket frames proved impossible for me.

I would get one step done (messy) then my fingers would start to stick to the CA and pull things apart.

Meanwhile the multiple trys (both using the CA with the metal to the plastic, and using the plastic cement to put together the plastic parts and trying to attach the plastic frames to the turrent) weakened the plastic frames more and more until it was literally melted into lumps where it needed to attach. The metal basket parts by this point looked like CA splotched crude anyways. I ended up throwing the baskets away before I could damage the otherwise pretty pristine turrent build.

I am trying both thick (but non-gel) Gorilla CA, applied with a toothpick, and very thin CA I got at LHS, which I find just gets everywhere and cannot be applied in small amounts.
I have looked at tutorials on using PE but they just make it seem so easy.
Thanks for any advice
 
Well, because they're there? That's why I use PE, lol. Seriously, working with PE can be a pain, but with a little patience it can be accomplished. If it's a hassle for you, don't use it, and save that headache for filling taxes, or something else. This is supposed to be fun and if it's not, you'll do something else. I feel your frustration, brother.

I use plain old Super Glue from Loctite, but some of the guys may have better solutions. Hang tough.
 
if most of you are fine with PE parts?
I can't speak for anyone else, but I'm not really a fan of etched parts, though I'll generally use them if they're there. That's to say, though I might not be a fan, I'm also not against them.

I wish kits would always have two methods for the areas they think need PE parts, one using it and one not.
A lot of manufacturers do just that, but some only give you one. MiniArt is bad that way in many of their kits, for example.

I am working on a Leopard 2 kit from Tamiya, and it has 2 air filter baskets that hang off the turrent sides.
Those are the kind of things where etched parts make a difference, IMHO. Those baskets are thin, perforated metal that's very hard to replicate well with plastic parts.

I am trying both thick (but non-gel) Gorilla CA, applied with a toothpick, and very thin CA I got at LHS, which I find just gets everywhere and cannot be applied in small amounts.
Apply it with a toothpick or a sharpened cocktail stick, too. As a further tip, sand the etched parts with medium-grit sandpaper, at least in those areas where the glue is to go. This will let the glue grip the metal much better than when you're applying it to the smooth surface that the parts usually have, and makes them stick more easily.
 
Also, all Gorilla glue products require you to dampen the surface with water first (says right on the label). I do understand your frustration AK, 1:12 Tamiya F1 kits p/e aftermarket comes with 4 full sheets of the stuff and I end up using maybe 1/2 of it . This is supposed to be FUN,...right?
 
I definitely feel like photo-etched parts are not needed for every kit

I also find some photo-etch detail is actually not as good as the plastic part as it is very "flat" in detail due to the nature of how it is made

However, there are some things where photo-etch just shines.

For example, ship cranes/hand rails/ radars and other parts that often wind up being cast as a solid blobs, or omitted all together
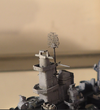
Sure it is fragile and this was one of my first attempts at a 1/700 ship let alone using tiny photo-etch parts so it is a bit sloppier than I would likem but still from normal viewing distance, the effect is so much better look that a solid piece of plastic with some raise lines
1739223883384.png

on the other hand, there are some parts like certain vents where a true "3-D" part looks better than the photo-etch

case in point, on the Bandai Millennium Falcon, they include photo-etch for some things but the plastic part actually has way more detail while the photo-etch parts is very flat looking and in many ways worse, for more work
Sure it provides more of a see through effect for the holes, but honestly the trade off is not worth it

1739223399094.png
1739223438472.png
 
Thank you for the advice. The water w/ gorilla CA glue seems odd. Not sure what that does for it? I appreciate the tips. BTW forgot to mention it is a Tamiya 1:35 tank kit.

On my first "adult" build it was a F/A-18 super hornet, I think Academy, and they had just a few photo etched, but one was for the cockpit seat belts. Like six pieces per seat. a shoulder belt, lap belt, and very very tiny little buckles. Even if the cockpit is open you can barely see them, but the PE metal did not look good. I did not even bother trying the little buckles after I lost one or two to springing away from tweezers.

On the Italeri Chinook I just completed they had decals for the seat belts and it looked much better and was much easier to do. That kit though had flexible black wire mesh for the turbine engine intake covers that was as messy for me as PE metal is. I think those covers could have been painted plastic and looked better. Maybe not as realistic if the mesh was done perfectly, but the mesh on mine does not look realistic at my skill level, it looks like a different type of bad on either side.
 
fine with PE parts?
Ah, PE, love to hate it. But as mentioned above, sometimes it really makes a difference.
Especially with things like containers, or racks, that dimensionally are usually way too thick in plastic.
Once I committed to using it, and buying After market accessories, I tried to set myself up for success.

Don't go nuts, a bit at a time...

As you get more experienced with it, you'll start thinking, if only I had a tool that did 'x'.
Some guys are able to wing it with few, if any of these, but for me that is usually at the expense of time and frustration. You can also improvise based on the tools and usage I describe. (Soooo many ways to do just about anything!)

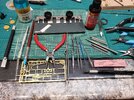
Here are some I find useful:
  • Glass plate with black card behind to cut parts off sprues, with a rounded knife blade.
  • square knife blade, to get under and bend
  • pin, applicator, toothpick to apply small drop glue
  • silicone tip tools to press or place part, with a bit of spit you can pick up very small parts! And the CA and other bench products clean off easily
  • rounded plyers, for bending curves
  • locking tweezers, spring and adjustable kinds
  • good quality fine tweezers that don't slide sideways and make the part fling
  • gooey stick (blue) for picking up and placing little pieces; I roll it on the glass to make it less sticky than the glue! (There is a tiny PE stuck on it in the photo) this stick has been out on the bench for months!
  • 240 grit sanding paper/foam for removing any excess off the piece once cut from the sprue
  • fine needle file for same
  • 'rolling pin' metal bars of different diameters for forming curved bends, or flattening a bit that might have gotten bent or wrinkled
  • 'toothless' pliers for flatening, holding and bending (with the square blade)
  • dedicated PE scissors and snips
  • 'cheaters', magnifier glasses that fit on your head (not shown) so much easier when you can see!
  • a PE bending tool, believe me, made such a difference: crisp, 90° bends on first attempt so the part doesn't lose strength, integrity or tear. There are many varieties, this is the relatively big one I found at my Local Hobby Store
  • still experimenting with burnishing liquid to remove grease and prep part before gluing and painting
  • CA accelerator: if you can manage to hold the part in place, a drop on the CA will instantly freeze everything in place. Excess 'cured' glue can be lightly sanded

17392350913996732132075027624151.jpg

Hope you find this overview helpful... tools and process are very personal things, but this is where I'm at!

Cheers
 
some photo-etch detail is actually not as good as the plastic part as it is very "flat" in detail due to the nature of how it is made
My experience is that Eduard especially is very prone to this. Their philosophy seems to be to replace everything even remotely suitable with a photoetched part, regardless of whether that makes it more accurate or realistic — sort of a "because we can" mentality. When I built Tamiya's M25 "Dragon Wagon" kit when it was newly released, I had also bought both of the initial Eduard sets for it. I ended up using about half of each, and all the rest was wasted because the plastic kit parts were better … I don't think I've bought an Eduard set since (or many etched sets at all, for that matter).

The water w/ gorilla CA glue seems odd. Not sure what that does for it?
Water is a catalyst for the polymerisation of the cyanoacrylate. In layman's terms: it makes the glue set quicker. This applies to all brands of superglue, of course.

A good way to make superglue set faster is to breathe on it. Put the parts together (with glue between them, of course), breathe in deeply, and then heavily breathe out onto the glued area so you put as much moisture from your breath onto it as you can. It won't instantly make them bond, of course, but will help at least the outer layer to set, thereby tacking the parts in place more easily.
 
Thanks,
So when you say Gorilla Glue, do you mean their "super glue" (thick viscosity but not their "gel" version), or do you mean their clear glue, which I am not sure is a CA glue or not? Is there any reason to get the accelerators? Is there a CA cleaner (for fingers, metal surfaces, and maybe even the plastic) that will not damage the plastic? I tried Acetone on my fingers and that does not work, ended up filing the glue off my skin, along with some skin ;-)
 
Ah, PE, love to hate it. But as mentioned above, sometimes it really makes a difference.
Especially with things like containers, or racks, that dimensionally are usually way too thick in plastic.
Once I committed to using it, and buying After market accessories, I tried to set myself up for success.

Don't go nuts, a bit at a time...

As you get more experienced with it, you'll start thinking, if only I had a tool that did 'x'.
Some guys are able to wing it with few, if any of these, but for me that is usually at the expense of time and frustration. You can also improvise based on the tools and usage I describe. (Soooo many ways to do just about anything!)

Here are some I find useful:
  • Glass plate with black card behind to cut parts off sprues, with a rounded knife blade.
  • square knife blade, to get under and bend
  • pin, applicator, toothpick to apply small drop glue
  • silicone tip tools to press or place part, with a bit of spit you can pick up very small parts! And the CA and other bench products clean off easily
  • rounded plyers, for bending curves
  • locking tweezers, spring and adjustable kinds
  • good quality fine tweezers that don't slide sideways and make the part fling
  • gooey stick (blue) for picking up and placing little pieces; I roll it on the glass to make it less sticky than the glue! (There is a tiny PE stuck on it in the photo) this stick has been out on the bench for months!
  • 240 grit sanding paper/foam for removing any excess off the piece once cut from the sprue
  • fine needle file for same
  • 'rolling pin' metal bars of different diameters for forming curved bends, or flattening a bit that might have gotten bent or wrinkled
  • 'toothless' pliers for flatening, holding and bending (with the square blade)
  • dedicated PE scissors and snips
  • 'cheaters', magnifier glasses that fit on your head (not shown) so much easier when you can see!
  • a PE bending tool, believe me, made such a difference: crisp, 90° bends on first attempt so the part doesn't lose strength, integrity or tear. There are many varieties, this is the relatively big one I found at my Local Hobby Store
  • still experimenting with burnishing liquid to remove grease and prep part before gluing and painting
  • CA accelerator: if you can manage to hold the part in place, a drop on the CA will instantly freeze everything in place. Excess 'cured' glue can be lightly sanded

View attachment 137551

Hope you find this overview helpful... tools and process are very personal things, but this is where I'm at!

Cheers
Thank you - great suggestions. What is the blue pick, is that the gooey stick? Is there good brand name to search for? Thanks again
 
It's almost a necessity these days on ship models, to use photo-etch for the finer details like rails, stairs, radar antennas, and the larger the scale, like 1/350 or bigger, for hatches, portholes, etc. Or maybe better put, it's almost expected to use it.
I build 1/700 scale, and PE can enhance the look of the finished model.
Of course, using PE is why my USS Pennsylvania build has been frozen for years. I still haven't worked with PE, and it's a stumbling block. I freeze at the thought of it.
And of course, build what you want, the way you want. It's not truly a necessity to use PE. And back in the day, before there was PE, you would have scratchbuilt those kinds of details from stretched sprue, wire, lead foil, etc. So it's not truly a necessity.
Best regards,
Brad
 
What is the blue pick
No worries, the long 'brush' on the left with the blue tip is the silicone (a set comes with different shape tips).

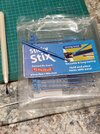
The short blue stick next to the needle file is this:

17392995302458469960241098634567.jpg
On the left is one I got years ago, not disposable, has a cap... but after 6 months it lost its grip.

The 'Stix' work pretty well, maybe too sticky for the smallest parts, unless you dull them by rolling on glass or between your fingers!
As for good brands, these are the only ones I have, and probably for quite a while!

I use them for placement, as in: tiny drop glue on the location they are to be applied, then place the part.

cheers
 

Latest posts

Back
Top