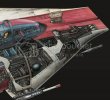
A-Wing newb build

Hey Igard, i thought i had an old single action airbrush somewhere that worked off air cans but i cant seem to find it anywhere. But yes i would really like to get a good quality airbrush and a compressor as i would love to have a go at using one for weathering and shading on a model like the Falcon. What is a good make of airbrush and compressor available in the UK? Also do you have a fume cabinet?
 
Your local hobby shop might not have a good range of airbrushes. Depends how big the place is.

I'm not the man to ask. I don't know a great deal about painting or airbrushes. I've got a Badger 100lg airbrush, which I like, and a budget air compressor from revell which I don't like and regret buying. It gets me by though.

I spray at my back door, but I've got a half mask respirator if I'm spraying anything nasty.
 
Just back from my local hobby store, a great little place with a guy that i chatted too for over an hour!
Just one prob is its such a small store that they didnt have everything i wanted and i also managed to come away with another new model to make.....a rather large model of USS Voyager. Hehehe

Oh well i'll have to try looking online for my paints and stuff. Still at least now i can get underway ;D
 
A other have mentioned, I would definitely replace the raise panel lines, it really does go a long way towards making the model look better.

On my A wing I took an exacto and carefully ran it right along the raised panel line a few times to get the scribed one, then sanded off the raised panel line and cleaned up the carved one with a scribing tool. That way it was easy to get all the panel lines vs sanding them all off first and having to start from scratch

As for the pilot, I kept the body and just resculpted the head

Also I filed the edges of the hull that hang over to make them look more in scale

I followed this guide, but skip the rebuilding the engine parts.
http://www.starshipmodeler.com/starwars/rm_awing.htm
Instead I just sanded it to make them more round and added the strip styrene detail on the inside of the rings. Again just adding the strip styrene really made a difference in the look
 
^ and there is also a great painting guide in that article. He gives the colors used which to me looks pretty dead on compared to the studio model
 
Just a quick update as i've been rather busy lately.

Started work on getting rid of the raised panel lines and re-scribing them as recessed lines.
I can see that this is a much better look already but it's gonna take me some time to do the whole model which is fine as it gives me time to think about a few other things, namely the pilot and maybe even lighting the cockpit and engines!
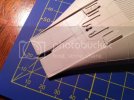
IMG_0987.jpg

Being the first time i've ever scribed panel lines i'm unsure how deep they need to be as i'm worried that if i undercoat the model first then paint the main colours i'll fill in these recess panel lines.....
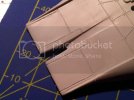
IMG_0990.jpg

At least so far i've managed to keep them relatively straight. ;D

Thinking of the pilot problem i was rummaging in the 'vault' again and found several packs of old Star Wars lead figures, one pack had several stormtroopers which i think will come in dead handy making a decent TIE fighter pilot model and maybe even a Falcon/Mos Eisley dio. Another pack had Rebel Troopers, one of which i'm planning on converting into an A-Wing pilot to replace the figure the model comes with.
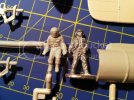
IMG_0991.jpg

I'm sure with some putty, a scalpel, some plastic card and some imagination he'll do just fine. ;)

Have a good weekend all.

TTFN Matt
 
Hey, fubar, this is looking pretty nice - excellent panel lines to be the first experience in making them!
When You turn to the center and rear parts of the hull, I'd recommend to use a thick masking tape (not the one we, modelers, use, but the one used in house building - it is a bit thicker and much less expensive) or the isolational tape used in electronics as a guider for your scalpel tip. With plastic card it is rather hard to make a straight panel line on a rounded surface, bending the card would take to much of your attention from the cutting itself. I've just applied the tape along the future line and then made 5-10 EXTREMELY soft moves along tape's edge with the cutter. Worked fine ;)
 
Panel work is looking good.

Another idea for your pilot is some transplant surgery:
Head swap.
 
Thx guys, its slow work but i'm happy with it so far.

At the moment i'm using a scalpel to follow the existing raised line, then once i've marked out a small section i sand it then open up the scalpel lines using a larger sculpting tool. Only thing is following along the raised lines can be a bit tricky as the blade wants to jump the raised line some times.

Do you guys use this method or do you sand the area flat first then use tape/card guide lines to scribe the new panel lines out.

Yeah a head swap might be a good idea, i may have to do something with the arms to as the original pilot model reminds me of Mr. Burns from The Simpsons. lmao
 
Nice work with those panel lines, Matt. And that looks like a good little figure for your pilot.

You're on the right tracks. :)
 
That figure looks much better than the old one.

As for panel lines. When I build up mine, I will probably do what you are doing. Scribe along the existing lines and then remove the lines.

But if you do remove the lines, I use Dymo tape It is a hard plastic tape used in label machines. It is also sticky on one side, so you do not need to hold it down and try to scribe. It will hold itself down.
 
I use the "follow the existing lines method". Using a sharp x-acto, I lightly run it along the raised line a few times, then sand away the raised line. I know a number of people just sand the whole thing and rescribe from scratch to get more accurate lines since some of the lines on the AMT version don't exactly match the stuido model, but using the existing linies for me was fine.

I think the panel lines look best at this scale when they are basically the width of the xacto blade.
 
My favourite method of re-scribing panel lines is to sand the whole thing smooth and start over from scratch (no pun intended). Sometimes, the kit's raised lines are innacurate and this gives you the opportunity to correct them. Also, scribing adjacent to the existing lines can sometimes cause a slight misalignment where the lines come together; this could end up being quite noticable on such a small model. This kit seems to lend itself to this treatment: 1) Drill out all the raised rivet detail (you'll lose these during the sanding process anyway). 2) Sand the raised panel lines smooth. 3) Use the rivet holes as location reference points for the re-scribed panel lines. 4) Draw all the lines in with a pencil before you scribe them. 5) Clean out/re-drill the rivet holes for a uniform appearance.

Your kit seems to be coming along nicely and you're taking the right approach by re-scribing the lines; it improves the looks of this model 100%. If you don't mind a word of constructive criticism, I suggest making several light passes when re-scribing the panel lines. The raised "furrows" on either side of your otherwise excellent scribed lines indicate to me that you might be taking too much material out in too few passes.
 
Building a model on a whole doesn't necessarily require you
to have massive technique to do it. But as you move on and
want to make your models pop a little more, the skills required
will involve technique. Scribing panel lines is one of them it's
just practice....practice .....practice. It's a technique you can practice
away from your model building. Unlike building a model where
you obviously just have to sit down and build them to get better! ;D
So you have already begun to practice good for you! ;D
find a scribing tool that works for you....it's not always the tool that works
for "the other guy". Build your passes up with small amounts of pressure
so you can create a small groove for the tool to ride in.Those first few passes are the most
important because the tool will follow what you originally set on each consecutive
pass. Keep practicing and keep up the good work thats a cool little kit!
 
I would recommend You to sand the lines completely before scribing new ones, as besides the fact that they might be slightly inaccurate as Splashcoat mentioned, it would be very difficult, or, at least, would take much more time for practice to get rid of the situation when the edge of the knife falls from the edge of the line and scribes through it (especially when You are making several gentle scribes to avoid plastic excess on thesides of a new line).
Don't know, if You've seen this, but these articles may be useful:

http://www.ipmsstockholm.org/magazine/1999/11/stuff_eng_tech_scribing.htm

http://www.largescaleplanes.com/tips/SasoKnez/Scribing/Scribing.php

http://www.clubhyper.com/reference/rescribingda_1.htm
 
Many thanks for the tips guys, very much appreciated, i'm sure i'll get quicker at this its just a case of being patient and lots of practice. ;D
 
Been a busy week at work so not got much done but had plenty of time for thinking about the model.
Theres one thing that bugs me about the model, having played the X-Wing/A-Wing games of old i know that the ship is armed with concussion missiles and they are one of its main weapons so i've decided to try and add them onto the model. These will obv have to be scratch built but i'm finding it hard to collect any decent info on what they would look like. I know roughly where on the ship they are supposed to be placed as i have all the Star Wars Cut-away books

Concussionmissile.jpg

I'm guessing the missile tubes would look something similar to those on an X-Wing just located inside the recessed panal along the ships side?!?!

Does anyone know of a decent set of blueprints or fan guide that has more info.

Thanks in advance and enjoy your weekend.

TTFN Matt
 
Hey Matt. Nice idea for a mod!

If I remember correctly, from playing the x-wing vs tie-fighter series, the concussion missiles were launched from around the same location you've indicated.

You could check youtube for gameplay videos. Or try firing the game up for old times sake.

I doubt the missiles were very large. Wasn't the payload around 8 missiles?

Correction: Found this website. I don't know how canon this information is, but it says 6 missiles per launcher, so 12 missiles total.

http://www.kitsune.addr.com/SF-Conversions/Rifts-SW-Vehicles/A-Wing.htm
 
@Igard Thx mate, i bought some brass tube and enough plasti card to sink a ship so i'll see what ideas i can come up with. I'm assuming that the ammo for the launchers would be hidden inside the ship rather than exposed to danger!?!?

I'm starting to look into tutorials for lighting this just basically and i'm wondering what are the best types of LED's for a kit this small? I'm thinking of a few optical fibres in the cockpit and the sub-light engines which if i remember correctly from the movies were rather bright....guess because of the ships high speed!?

I tried my local Maplin and the prices there were very high for small quantities and when i looked on ebay i had no idea which types are best for models i.e. voltage wise, temps etc....
 

Latest posts

Back
Top