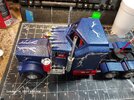
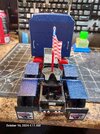
Kenworth W900 Aerodyne 1:25 scale (Revell)

A really nice looking build that - well done. I do like that colour you've used on the bodywork and you did a nice job on the interior and the engine. The Aerodynes are great looking trucks, I really wish they'd re-release the 1/25 cabover kit - they're hard to find these days.

Looking forward to seeing this complete.

Cheers!

Oh and I like the avatar!
thanks that means alot. JW was my character example growing up. Kids now days need someone to look up to and teach them good character rather that all this BS activist this n that and anti america BS.

We need another Duke type hero.
 
thanks that means alot. JW was my character example growing up. Kids now days need someone to look up to and teach them good character rather that all this BS activist this n that and anti america BS.

We need another Duke type hero.

Ahem to that - back in the days when men were men and we knew what that was supposed to be.

I always loved JW's films as a kid - I always thought he was a good actor... Actually I might have to dig one of his films out of my DVD's collection and put it on.
 
Question - when this is 100% finished, if i wanted to, i could spray the whole thing with clear, windows, chrome, everything and no harm done, is that correct?
 
clear, windows
NO!!! The windows will frost and ech your chrome will turn to a flat color silver you basically will ruin your model and the clear may have a reaction to the paint you use and crows feet and crack. If you want to clear coat it use pledge floor polish and gently brush it on works every time. But I would leave the windows alone just in case. But many of us "Wingy" guys use floor polish on our canopy but it's not a big part like your windows and we dip it and let dry. You may get running effects because you didn't dip your windows in floor polish before you installed them. Glad you asked first before you proceeded.
 
Last edited:
I will leave it as is when done. Thanks so much for the quick reply. I made some custom decals and waiting for them to dry. I learned many things on this build including alot about custom decal creation. :) I will post some final pics when im done.
 
I made some custom decals and waiting for them to dry.
Your very welcome. Make sure you seal those decals with a decal sealant or try out your clear on a little piece of one or when they hit the water you will have a color party all the ink will come off the receiver paper.
 
Your very welcome. Make sure you seal those decals with a decal sealant or try out your clear on a little piece of one or when they hit the water you will have a color party all the ink will come off the receiver paper.
Thanks, Yeah been there done that a week or so ago. As soon as i touched it, it went poof in a kazillion pixels right in my hand lol Thats because i did not read the directions, ya know its a guy thing... we dont need no stinkin directions lol

Actually we do... yeah they are sprayed with clear and drying...

Wait that came out the wrong way "As soon as i touched it, it went poof in a kazillion pixels right in my hand" lol
Be sure to post the finish I would like to see how your decals turned out.
 
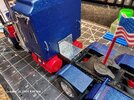
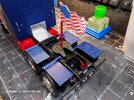
I decided to try to find another rear fender to cover the other set of tires (kit does not include 2, just 1). I thought i was gonna have to contact revell in germany, but i was curious i was amazed i found one on ebay.

I was going to leave a link but the item was removed after it was sold to me. Aehhh $12 including shipping.

But here is a pic.

rear_fender.jpg

Interesting, so i was not aware that people took models and parted them out on ebay, i bet they make a ton doing that.
 
I decided to try to find another rear fender to cover the other set of tires (kit does not include 2, just 1). I thought i was gonna have to contact revell in germany, but i was curious i was amazed i found one on ebay.

I was going to leave a link but the item was removed after it was sold to me. Aehhh $12 including shipping.

But here is a pic.

View attachment 126432

Interesting, so i was not aware that people took models and parted them out on ebay, i bet they make a ton doing that.
Yes they been doing that for years and has really helped me out by doing it
 
Yes im sure it helps alot of people in a pinch and to make custom stuff. I just never knew people did that but it makes perfect since now.

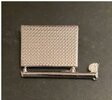
I also ordered another chrome skid plate. I will put that over the bad area where the brush strokes are, it will look nice.

skidplate.jpg
 
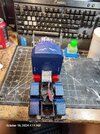
Still need to get the grandsons nameplate made at the trophy shop for the rear of the sleeper, but its all done otherwize.

Looks so much better with the additional rear fender, revell should include one in the kit IMO. Also the addional skid plate does a nice job of hiding the assembly hole in the back.

If you do this kit, order another rear fender when you do, i found mine on ebay, its worth it.

To mount the extra fender i cut the middle section that connects them out and it fits perfect. I used a small piece of cardboard as a spacer on top of the tire till glue dried.

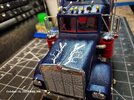
I cut up and moved some of the decals to the roof and hood, looks better there. Not sure but i think 2 decals shrunk a bit. They are not where i left them and seem to have moved slighty over the last week sitting idle.

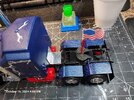
I also used part of the sprue and made a flag pole and made a paper flag.

I would and will do this kit again. It was both challenging and fun to do.


20241016_040908.jpg20241016_040914.jpg20241016_040920.jpg20241016_040926.jpg20241016_040934.jpg20241016_041108.jpg20241016_041113.jpg
 
Still need to get the grandsons nameplate made at the trophy shop for the rear of the sleeper, but its all done otherwize.

Looks so much better with the additional rear fender, revell should include one in the kit IMO. Also the addional skid plate does a nice job of hiding the assembly hole in the back.

If you do this kit, order another rear fender when you do, i found mine on ebay, its worth it.

To mount the extra fender i cut the middle section that connects them out and it fits perfect. I used a small piece of cardboard as a spacer on top of the tire till glue dried.

I cut up and moved some of the decals to the roof and hood, looks better there. Not sure but i think 2 decals shrunk a bit. They are not where i left them and seem to have moved slighty over the last week sitting idle.

I also used part of the sprue and made a flag pole and made a paper flag.

I would and will do this kit again. It was both challenging and fun to do.


View attachment 127482View attachment 127483View attachment 127484View attachment 127485View attachment 127486View attachment 127487View attachment 127488
This is a great build. Did the lightning decals come with the kit?
 
Back
Top