1/25 Trumpeter American LaFrance Eagle Pumper Fire Truck

DavidsScaleModels

Well-Known Member
Joined
Sep 16, 2022
Messages
147
NEXT UP – Trumpeter's 1/25 scale American LaFrance Eagle Fire Pumper Fire Truck which is a commission build. The client trained and served as a volunteer fireman on this truck. This is the first time I built a fire truck so this will be an interesting build for me. The client also furnished many photos of the actual fire truck. I am also going to use resin accessories from Three Inches Under. They have accessories for their line of hundreds of American made resin detail parts and graphics for scale model funeral cars, ambulances, police cars, fire apparatus, taxis, commercial vehicles and related dioramas. The kit comes with s sheet of photo etch details and the decal set matches the exact truck the client worked with helps with this build.

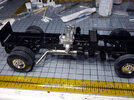
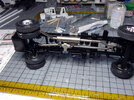
Starting off I am starting with the chassis. I painted all the items that mount to the frame with Tamiya semi-gloss black. For the shocks I used flat black for the rubber covering on them and the batteries. I also assembled the pump and transfer case. These were painted using Vallejo Metal Paint in duroaluminum. The other brackets, mounts, oil filter were all assembled. The frame itself was painted using satin Frame black. The suspension and rear axle were assembled and mounted onto the frame as well. The tires are a soft plastic. I the scrubbed 400 grit sandpaper to replicate some minor wear/usage on the tires tread pattern. I still have some minor details to add to the frame then the exhaust system and to properly install the wheels and tires. Then on to the building the rest of the truck.


You can see all the photos and details from the start in the build log at: https://davidsscalemodels.com/build-log/1-25-american-lafrance-eagle-fire-truck/


DSCN3231.jpg


DSCN3234.jpg


DSCN3241.jpg


DSCN3244.jpg


DSCN3245.jpg


DSCN3257.jpg


DSCN3259.jpg


DSCN3260.jpg
 
Ha! Walking by the local fire hall I've wondered if the fire engine didn't get more wear from all the TLC then actual duties!
Looking forward to seeing how you pull this one off!
 
The second week of the American LaFrance Fire Truck has the chassis completed. I drilled out the end of the exhaust pipe and thinned out the pipe wall to make it more realistic. The drive shafts were then installed and all the wheels were installed.

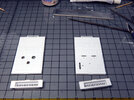
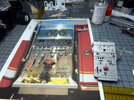
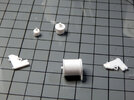
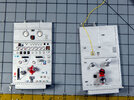
The next section to work on is the pump section which has a control panel on one side and outputs on both sides and finally a nozzle on top. To start with the kit control panel has three control levers molded flat on the surface. I cut these levers off and drilled out the slots. I then used some styrene rod to make the levers. For the knobs on the end I used a candle to heat up the end and create the knob. I then detail painted the panel. The kit comes with decals for the gauges and placards. The gauge decals are too large for the panel. The decals do not fit inside the rim rings. To correct this I scanned in the decal sheet and reduced the size by 3% and then printed out a new decal sheet. The gauge decals now fit perfectly inside the gauge trim rings. For the chrome trim rings, dials, and hose connections I used a Molotow Chrome paint pen.

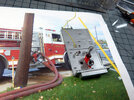
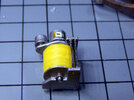
While certain areas on the control panel were drying I started looking at the opposite side panel and the top panel. On the opposite side panel is a "tower light" this portable light has a reel of cable to provide power. The reel on top had molded area to represent the cable. I opted to sand these down and use actual 30 gauge yellow wire. The light is stored on the side panel. The kit has the cable molded to the panel I trimmed this off and replaced it with the yellow wire. Once the section is assembled I will route the wire to the reel. On top of the panel was a long hand bar. The reference photos show a smaller bar. I cut off the one on the kit and then using styrene rods I scratch built the correct one. I then detailed the passenger side panel to match the reference photo.

I am hoping to finish the pump section this week which includes a scratch built yellow hose with a scratch built nozzle this is stored in the bottom of the control panel in the reference photos. I will cover how I am replicating hoses next week.

You can see all the photos and details from the start in the build log at: https://davidsscalemodels.com/build-log/1-25-american-lafrance-eagle-fire-truck/


DSCN3261.JPG

DSCN3262.JPG

DSCN3269.JPG

DSCN3271.JPG

DSCN3276.JPG

DSCN3281.JPG

DSCN3283.JPG

DSCN3285.JPG
 
The third week of the American LaFrance Eagle ended with the pump section being built up and completed. I assembled the walls and then added the upper fixed nozzle. The wire for the tower light was attached to the reel. The kit came with a plastic tube for the feed line to the fixed nozzle I replaced this with a section of aluminum tubing. The reference photos show hoses stored in the bucket of each panel. On the control panel side is a small yellow "trash" hose with a small hand held nozzle. I scratch built the nozzle using round and square styrene rods and a photo etch lever. The outlet panel on the other side has a medium hose with couplers on each end. The couplers were made with styrene tubing. On a side note the deck for the fixed nozzle has a light in a chrome bezel. Cutting the chrome bezel off the tree leaves a part of the chrome missing. The Molotow chrome paint pen matches the chrome of the kit perfectly.

Now for the hoses themselves, I used 3M glass cloth tape. This is a cloth tape with a silicone adhesive. I have two rolls. One that is 0.75 inches wide and on that is 0.3" wide. The smaller width is perfect for the small hoses. It is folded in half and creates the perfect width for them. The larger width is folded to make the medium and larger hoses. Folding this ¼ of the way and wrapping the other over this creates the medium hoses and then half and half creates the large hose. Once folded the adhesive holds them together but I run CA glue across the seams to hold them permanently. These white hoses are unpainted. The dirty white appearance looks exactly like the reference hoses. The yellow is Vallejo Model Air paint. This is thin enough to be absorbed by the cloth tape so when folding or shaping the hoses there is no cracking or flaking of the paint.

With the pump section completed I then began work on the rear section. This required the outside sections to be painted Fire Engine Red. I also decided to paint the front cab as well. I painted the upper area of the cab with gloss white and the lower section with the red. While these were set aside to dry I then assembled the rear bed. The kit provides the dividers in photo etch. After I installed the dividers I took the reference photo of the bed and scaled it to the kit. This allows me to measure the width of the hoses so I can replicate them to stack them up.

It looks like I will be spending most of next week making many hoses. I am hoping to finish off the rear section by next weekend and then starting on the cab.

You can see all the photos and details from the start in the build log at: https://davidsscalemodels.com/build-log/1-25-american-lafrance-eagle-fire-truck/


DSCN3290.jpg


DSCN3292.jpg


DSCN3294.jpg


DSCN3298.jpg


DSCN3300.jpg


DSCN3301.jpg


DSCN3302.jpg


DSCN3303.jpg


DSCN3306.jpg


DSCN3311.jpg
 
The fourth week of the Eagle was spent making fire hoses. There are not a lot of photos this week as it is taking a little more time making the fire hoses than I originally thought. This is due to the numerous hoses and their length. The bed has small and two sizes of medium hoses. Some of the medium hoses are yellow. So these hoses needed to be painted. To match the faded yellow hue I used a 50/50 mix of Vallejo yellow and ivory white.

For reference, the small hoses are 0.15" wide, the yellow medium hoses are 0.25" wide and the white medium hose that I am working on now are 0.21" wide.

The small white hoses have couplers that attach to the outputs on the back panel. On the reference photo one of these have the nozzle shown in the middle of a stack as well. All of these are scratch built using styrene rods and tubes. I am hoping to finish all the rear hoses this week and then adding all the details and finish the painting on the rear section.

You can see all the photos and details from the start in the build log at: https://davidsscalemodels.com/build-log/1-25-american-lafrance-eagle-fire-truck/


DSCN3314.jpg


DSCN3315.jpg


DSCN3316.jpg


DSCN3317.jpg


DSCN3320.jpg
 
You're a better man than I.

If it were me I'd fill those racks with cotton balls or wadding and only have the visible edges and maybe a top layer or three of the hose material. I'm not one of those "I know the detail is in there" types when it comes to fabrication. Maybe if the kit came with the detail to be never seen again, I do like Zoukei Mura aircraft, but not if I have to make the stuff myself.
 
Here we are at the fifth week of the Eagle and I am still working on the hoses. The client sent me a drawing of a little better detail on what and how the hoses in the hose bed are stored. Using this and the reference photo I had to add some more details. Four of the smaller hoses have nozzles on them. Using styrene rods I scratch built these and inserted them into the hose stack. For reference I have currently used over 30 feet of the cloth tape making hoses. I have one more stack of the medium hoses to make which will complete all the hoses in the bed.

One more thing that I need to scratch build is a "Humut Valve" that sits on the rear bumper deck. One of the yellow hoses is also hooked to this valve as well.

I will be finishing the last hose stack tonight then I can start detailing the rear section. My goal is to have the rear section completed by the end of the week and then start working on the front section and cab.

You can see all the photos and details from the start in the build log at: https://davidsscalemodels.com/build-log/1-25-american-lafrance-eagle-fire-truck/


DSCN3321.jpg


DSCN3322.jpg


DSCN3323.jpg


DSCN3329.jpg


DSCN3330.jpg
 
The sixth week of the Eagle I finally finished the hoses! I do need to mention one correction. The hoses on the right side needed to have the routing corrected. The second to the end hooks up the truck and then goes to the third from the right. I also added the "dog ears" to the small hoses which is used to pull the hoses off.

I then scratch built the "Humat" valve that sits on the rear and has the large yellow hose coupled to it. I used styrene tubing and rods with a couple of photo etch pieces for the top.

With the hoses done I then began adding the decals and gloss clear coat to the rear section. This was done at this point as I did not want to clear coat the chromed parts. The clear coat will dull the mirror finish of the chrome parts. A side note about the kit chrome parts, trimming them off the trees leaves a part not chromed. The Molotow chrome paint pens match the chrome finish perfectly. Just remember that once painted with the pen it needs to dry overnight.

I started adding the details like the door latches and the lights to the rear section. First was the blue light and chrome bar on the top along with the rear lights under the hose bed. The latches and side lights were then added to the right side. On top of the right side is a rack that sits under the ladder racks. This holds more hoses in red nylon bags. The kit part is smooth with lines molded in for the straps that hold them in place. I sanded off the molded straps and covered the bags in red nylon cloth and then made straps using strips cut from the cloth tape. While the touched up chrome parts were drying I then needed to make the license plate. The kit does provide the light that shines on the license plate but they do not include the plate of the plate mount. I used the reference photo and duplicated the plate. I will use some thin sheet styrene to make the plate holder.

I am currently working on the left side lights, tail lights, and the light bar that mounts on top. I then need to work on the ladder racks and ladders. I believe this will complete the rear section and I can then move onto the front section and cab interior details.

You can see all the photos and details from the start in the build log at: https://davidsscalemodels.com/build-log/1-25-american-lafrance-eagle-fire-truck/


DSCN3332.jpg


DSCN3335.jpg


DSCN3336.jpg


DSCN3337.jpg


DSCN3338.jpg


DSCN3340.jpg


DSCN3341.jpg


DSCN3342.jpg


DSCN3345.jpg


DSCN3351.jpg
 

Latest posts

Back
Top